Showing posts with label Comments. Show all posts

Wednesday, 16 January 2013

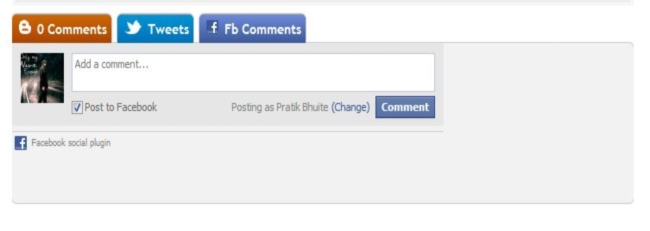
Integrate Facebook/Twitter Tab in Blogger Comment Box

Add Facebook/Twitter Tab in Blogger Comment Box

Add Facebook/Twitter Tab in Blogger Comment Box

Liked The facebook and Twitter tab Integration in intensedebate??
want facebook comment system along with default blogger comment box??
So here is the trick how to do that..!!!

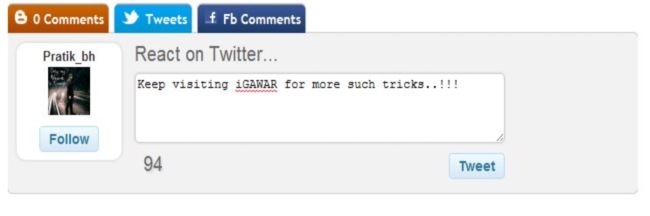
iGAWAR Presents Integrate Facebook/Twitter Tab in Blogger Comment Box, A tutorial that will Explain How to add facebook and twitter comment box along with your blogger default box to increase your visitors..!!!
So here is the trick to do so..!!

  • Go to Blogger Dashboard --> Template --> Edit HTML
  • Backup your Template before making any changes to your blog.Click here to know how to backup blog. 
  • Now Check Expand Widget Template.
  • Press Ctrl + F and search the code shown below.

<head> 

ADD Below Code Just Below <head>


<meta content='pratik.bhuite' property='fb:admins'/>
<meta content='YOUR_FACEBOOK_API' property='fb:app_id'/>
<script src='http://code.jquery.com/jquery-latest.pack.js'/>
<script src='http://jsblogstop.googlecode.com/svn/commentpages/jsCommentPages.js'/>
<script src='http://connect.facebook.net/en_US/all.js#xfbml=1'/>
<script src='http://jsblogstop.googlecode.com/svn/jstweetbox/v1/jsTweetBox.js'/>
<script src='http://platform.twitter.com/anywhere.js?id=TWITTER API KEY&amp;v=1'/>


Now Search for Below code

<div class='comments' id='comments'>

Now add The Below code just after above Code...!!!

<b:if cond='data:blog.pageType != &quot;static_page&quot;'>
<div class='js-default-tab comments-tab' id='blogger-comments' title='Comments from Blogger'>
<data:post.numComments/> Comments
</div>
<div class='comments-tab' id='twitter-comments' title='Comments with Twitter'>
<span class='js-page-tweet-count' expr:href='data:post.url'/> Tweets
</div>
<div class='comments-tab' id='fb-comments' title='Comments made on Facebook'>
<fb:comments-count expr:href='data:post.url'/> Fb Comments
</div>
</b:if>
<div class='clear'/>
</div>
<div class='comments-page' id='twitter-comments-page'>
<div data-bitly-key='R_b5f7d5706378f044755c16d1296708bb' data-bitly-login='pratikbhuite' data-publisher='pratikbhuite' id='js-tweet-box'/>
</div>
<div class='comments-page' id='fb-comments-page'>
<b:if cond='data:blog.pageType == &quot;item&quot;'>
<div id='fb-root'/>
<fb:comments expr:href='data:post.url' num_posts='10' width='500'/>
</b:if>
</div>
<div class='comments comments-page' id='blogger-comments-page'>


Now change the following things form the code

pratik.bhuite   ::  your facebook ID
YOUR_FACEBOOK_API :: your facebook API (Application ID CODE) code.
TWITTER API KEY ::  your Twitter App id key.
R_7fb135d4103581f8d39f59a86612ff27  :: yoyr btyly.com key and username.
if you dont hav bytly.com account keep my key/username only..!!


If you have any problem with this Trick then feel free to ask in comment box below..!!
Keep visiting @iGAWAR

Wednesday, 24 October 2012

How to Add A Picture To Anonymous Comment Of your Blog Post

How To Change Blogger Default Anonymous Comment Avatar/picture

How to Add A Picture To Anonymous Comment Of your Blog Post-iGAWAR
Want to change Your anonymous Comment Avatar??
Want to stylify Your blog Comment using Cool Avatar??

iGAWAR Presents How to Add A Picture To Anonymous Comment Of your Blog Post, A tutorial That will help you to change your default Anonymous Comment Avatar/Image in Easy Steps..!
Change Avatar of Anonymous As well As Default Pic And Make You Blog Attractive..!!

So lets Start With How To do This:


  • Go to Blogger Dashboard --> Template --> Edit HTML
  • Backup your Template before making any changes to your blog.Click here to know how to backup blog.
  • Press Ctrl + F and search the code shown below.


</body>

Add Following  Code Just Above The above Code:

<script src='http://code.jquery.com/jquery-latest.js'/>
<script>
$(&quot;img[src=&#39;http://img1.blogblog.com/img/anon36.png&#39;]&quot;)
.attr(&#39;src&#39;, &#39;https://blogger.googleusercontent.com/img/b/R29vZ2xl/AVvXsEhDoVrwwOyDVJNQ0ie9GW927nQv9dIN3PIbz76Lk3edFHWQd1akz1py_rcak_cxwEjfmys4HTzmnKRNgLw5g437dd5NZpVFut_Raie64zubnKP2VtWO_uQgm2OW0SQK-sMppQ3HRT2LW4w/s1600/default_avatar.gif&#39;)
.ssyby(&#39;blank&#39;)
</script>
<script src='http://code.jquery.com/jquery-latest.js'/>
<script>
$(&quot;img[src=&#39;http://img2.blogblog.com/img/b36-rounded.png&#39;]&quot;)
.attr(&#39;src&#39;, &#39;https://blogger.googleusercontent.com/img/b/R29vZ2xl/AVvXsEg8AY3LS57hSptAMOLx1Fv-mc5rvoMziJsfsLdckAXzirRJcgYf2wkY-mJvedPQoLFcNdEvh64okb2JPnLlcW_lIEsVEOrZKkwa05A4yW1CE9Bw-XLaqrVH1ESvJN8U9VJGpguARV1F4O8/s1600/blogger-user.png&#39;)
.ssyby(&#39;blank&#39;)
 </script>


Change the Pic Url In RED With Your Choice To change Anonymous Avatar.
Change Pic Url In Green With Your Choice To change Default Avatar.

Some Good Picture url Are:


https://blogger.googleusercontent.com/img/b/R29vZ2xl/AVvXsEhDoVrwwOyDVJNQ0ie9GW927nQv9dIN3PIbz76Lk3edFHWQd1akz1py_rcak_cxwEjfmys4HTzmnKRNgLw5g437dd5NZpVFut_Raie64zubnKP2VtWO_uQgm2OW0SQK-sMppQ3HRT2LW4w/s200/default_avatar.gif


https://blogger.googleusercontent.com/img/b/R29vZ2xl/AVvXsEgBpAT5VZGS58_VvD7mOhKzrvW96U82fMSqZhU2e-t-pdW6XChnTe6IKTqne-qX7rV_W4_OeSg2WUiPmzMOgn3b-HLG_9MeJ6QrJQpIhAavlVSgbMkbGneesZ4B4lnV6MOOCvKpf8lcteE/s1600/facebook.gif


https://blogger.googleusercontent.com/img/b/R29vZ2xl/AVvXsEhZvmBBMvbQSZMrE6vXnHO8x9cR7OQH0x01_E8URCYBqOSlu8FaQO6aXA5V-6wwCJbc089OO1W3abGJJH6l3e9LrAAmmc2E_Io0JlECXih_h1k2d-fuxVv7lXlvIMg8HM41RTMAH3Rf23M/s1600/anonymous3.png

https://blogger.googleusercontent.com/img/b/R29vZ2xl/AVvXsEjVZDnZUJ8UgaWsG0Mus6v1UH4eBW4zOJzsgqhSKIf2D_328pW-j3EwITwlWUFTC24HS2OnzPbZf8j-G-lEtOOqU5XRI0CTsSGCc048ZeZCZywN-VoHWCKERC54JqASlQVYyAXw0Fym1iFE/s1600/blogger-user.png


  • Preview Your Template And Save it..!!


If you facing any problem with this Trick then feel free to ask in comment box below..!!
Happy Blogging..!!
Keep visiting @iGAWAR

Sunday, 23 September 2012

How to Customize Thread Comment System CSS

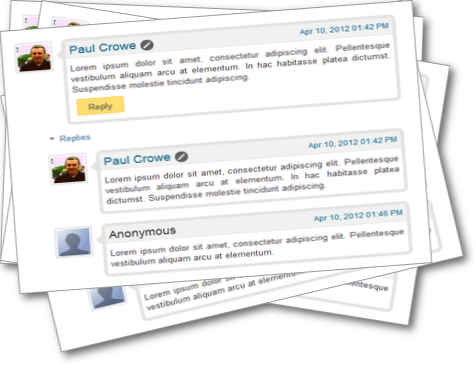
Tutorial for Customizing Thread Comment System For Best Comment box


Tutorial for Customizing Thread Comment System For Best Comment box

Every blogger wants a cute/macho look for their blog..!!
Comment box plays very important role in template view...!!
So HOW TO CUSTOMIZE COMMENT BOX??

iGAWAR Presents How to Customize Thread Comment System CSS,A tutorial for customizing Thread Comment system..!!!

So Now how to Customize Thread Comment Css..!!

Just follow The below steps..!!

  • Go to Blogger Dashboard --> Template --> Edit HTML
  • Backup your Template before making any changes to your blog.Click here to know how to backup blog.
  • Now Check Expand Widget Template.
  • Press Ctrl + F and search the code shown below.
]]></b:skin>

Now ADD the Below code Just above it..!!


#comments{overflow:hidden}
#comments h4{display:inline;padding:10px;line-height:40px}
#comments h4,.comments .comment-header,.comments .comment-thread.inline-thread .comment{position:relative}
#comments h4,.comments .continue a{background:#d80556}
#comments h4,.comments .user a,.comments .continue a{font-size:16px}
#comments h4,.comments .continue a{font-weight:normal;color:#fff}
#comments h4:after{content:"";position:absolute;bottom:-10px;left:10px;border-top:10px solid #d80556;border-right:20px solid transparent;width:0;height:0;line-height:0}
#comments .avatar-image-container img{border:0}
.comment-thread{color:#111}
.comment-thread a{color:#777}
.comment-thread ol{margin:0 0 20px}
.comment-thread .comment-content a,.comments .user a,.comments .comment-thread.inline-thread .user a{color:#d80556}
.comments .avatar-image-container,.comments .avatar-image-container img{width:48px;max-width:48px;height:48px;max-height:48px}
.comments .comment-block,.comments .comments-content .comment-replies,.comments .comment-replybox-single{margin-left:60px}
.comments .comment-block,.comments .comment-thread.inline-thread .comment{border:1px solid #ddd;background:#f9f9f9;padding:10px}
.comments .comments-content .comment{margin:15px 0 0;padding:0;width:100%;line-height:1em}
.comments .comments-content .icon.blog-author{position:absolute;top:-12px;right:-12px;margin:0;background-image: url(https://blogger.googleusercontent.com/img/b/R29vZ2xl/AVvXsEjsOjd28Gh0GyFicWiXOzri4oRLKckNCVoFOdidQHy0fj8tF7CDvtIfuJmZ2YAiz6mcT57OqPTcYlGQQeYazcpXJADTSnBgr1rvXR6nTig-GEt8Kha4bEysuCYqhvIGbeb8VzGwEXaklFM/s320/author-pink.png);width:36px;height:36px}
.comments .comments-content .inline-thread{padding:0 0 0 20px}
.comments .comments-content .comment-replies{margin-top:0}
.comments .comment-content{padding:5px 0;line-height:1.4em}
.comments .comment-thread.inline-thread{border-left:1px solid #ddd;background:transparent}
.comments .comment-thread.inline-thread .comment{width:auto}
.comments .comment-thread.inline-thread .comment:after{content:"";position:absolute;top:10px;left:-20px;border-top:1px solid #ddd;width:10px;height:0px}
.comments .comment-thread.inline-thread .comment .comment-block{border:0;background:transparent;padding:0}
.comments .comment-thread.inline-thread .comment-block{margin-left:48px}
.comments .comment-thread.inline-thread .user a{font-size:13px}
.comments .comment-thread.inline-thread .avatar-image-container,.comments .comment-thread.inline-thread .avatar-image-container img{width:36px;max-width:36px;height:36px;max-height:36px}
.comments .continue{border-top:0;width:100%}
.comments .continue a{padding:10px 0;text-align:center}
.comment .continue{display:none}
#comment-editor{width:103%!important}
.comment-form{width:100%;max-width:100%}


The names will now have a pink color to it and the author’s comment will have a ribbon on the top-right corner of the box labeled ‘Author’ with the same color.

 If you wish to change the color, simply change d80556 to any of the following:
BLUE :: 1e05d8
GREEN :: 56d805

Now Save the Template And Visit Your Blog to See the Changes..!!

If you have any problem with this Tutorial then feel free to ask in comment box below..!!
Keep visiting @iGAWAR


Replace Default Comment system To Best Threaded Comment System For Blog/Website

Replace Default Comment view To Best Threaded Comment view For Blog/Website

Replace Default Comment view To Best Threaded Comment view For Blog/Website
Every blogger wants their blog looks cool..!!
Default Comment box provided by blogger or wordpress is boring and gives weird look to blog..!!
Not moving to 3rd party comment system like intensedebate coz that too increase loading time of blog.
So how to make comment system look Awesome??


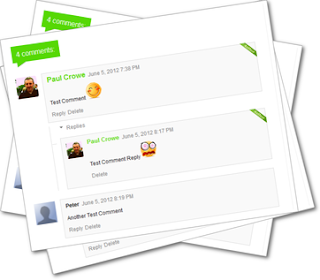
iGAWAR Present Replace Default Comment view To Best Threaded Comment view For Blog/Website , A tutorial that will completely change your blog's commenting experience..!!
Blogger upgraded their interface but it seems they didn't worked on their commenting policies.!!
Many of blogger tried third party comment services like intensedebate but soon they realise that Using such services increasing their page size and thus increasing their loading time..
So the question is, WHAT TO DO??


And answer came in the face of THREAD COMMENT SYSTEM...!!!
Today almost 60% of bloggers using Thread comment system..!!

So here is the step to step tutorial for how to replace Old default blog comment system to thread comment system..!!

Just follow the below steps::


  • Go to Blogger Dashboard --> Template --> Edit HTML
  • Backup your Template before making any changes to your blog.Click here to know how to backup blog.
  • Now Check Expand Widget Template.
  • Press Ctrl + F and search the code shown below.


<b:include data='post' name='comments'/>

iGAWAR's template Got 3 such code.Replace them all with the code below..!!


<b:if cond='data:post.showThreadedComments'>
<b:include data='post' name='threaded_comments'/>
<b:else/>
<b:include data='post' name='comments'/>
</b:if>


Bingo..

Thread comment Got ENABLED for Your Blog..!!

Save the template..!!

Please note that even your Comment system got activated but your comment looks will remain same untill you wont Upgrade your Comment CSS ..!!


If you have any problem with this Trick then feel free to ask in comment box below..!!
Keep visiting @iGAWAR